

Adapting Stitch Patterns to Fit Shawl Shapes
The number one question I’m asked about shawl design is about adapting stitch patterns to fit certain shawl shapes, especially for lace stitch patterns. Different shawl shapes need different stitch patterns – a rectangular chart will not do the job for a triangle shawl, for instance.
This post introduces adapting stitch patterns and provides an introduction to my article series about adapting stitch patterns.
Adapting Stitch Patterns: Table of Contents
Part 1: Making Shawl Stitch Patterns Fit Different Shawl Shapes (this post)
Part 2: Tools and Helpers for Adapting Stitch Patterns
Part 3: Adapting Charts for Triangle Shawls
Part 4: Circular Shawls and Stitch Patterns
Part 5: Spicing Up Crescent Shawls With Lace Patterns
Part 6: Adapting Cornucopia Shawls
Part 7: Faroese Shawls With Stitch Patterns
Part 8: Other Shawl Shapes
Stitch Patterns & Shawl Shapes
A few days ago, I asked my mailing list the following question:
“I’m writing a guide on adapting stitch patterns to different shawl shapes and unsure about how to name it. When you think about altering stitch patterns (charts, colorwork, whatever), what comes to your mind first?”
The answers were many (thank you!) and had a clear central theme: Are there basic rules for making knit shawl stitch patterns fit different shaped shawls? And if yes, how to do it?
Adapting Stitch Patterns
Triangle shawls need different stitch patterns than stoles, for instance. Crescent shawls are a question of their own but yes, crescent shawls can include stitch patterns, too! There’s no limits in using lace or color patterns in whatever shawl shape you choose.
We can design lace shawls in any shape we desire!
Yes, even for crescent shawls. And for cornucopias, swirls, Faroese shawls and so on – not only for triangles and stoles. Promise.
Basic Rules for Making Shawl Stitch Patterns Fit Different Shawl Shapes
There’s two ways of approaching this question. First, we could start with a shawl shape and adjust our stitch pattern to fit the shapes. The other option is to select the shawl shape based on the shape of a certain stitch pattern.
As stitch patterns are mostly published in rectangular shapes, the first way – adapting the pattern to the shawl shape – is the more important one to understand. Besides that it will help you getting a deeper understanding of the subject as well as mastering the second way – selecting shape by pattern – easily.
There’s three rules to follow. After giving an overview, we’ll look at some examples below.
Rule #1: Know Your Shape
You need to know your shape and its construction principle. Which shape are your working? Are you going to work it top down. bottom up, sideways or in some other way? You need to know your increases (or decreases) to be able to define your canvas.
If our desired shape was a triangle worked sideways we can choose our increase rate to one stitch per row for instance – increase one stitch per row on one side only:
- Row 1 (RS): k1, YO, k to end of row.
- Row 2 (WS): k t last st, YO, k1.
- Repeat the last two rows until shawl is of desired size.
Rule #2: Define Your Canvas
As soon as you know your shape you can define your canvas. Your canvas is your drawing space, the area you have available for your stitch pattern. The best way to get an idea of your drawing canvas is to sketch an empty chart including all increases or decreases your shape needs.
Let’s do this for our example above, a triangle shawl with increases on one side only. Your drawing canvas would look like the following picture.
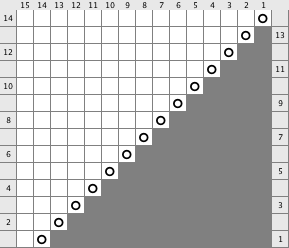
Rule #3: Design Within Your Canvas
All stitches shown in white in the picture above are available for your stitch pattern. Within this frame you can design whatever you desire. There is only one rule: in sum, all increases (yarn overs or similar) have to be paired with corresponding decreases (ssk, k2tog, …).

I hope this article helped you figuring out the principles of how to adapt stitch patterns from one shape to another. To learn more about chart adjustments for specific shawl shapes have a look at the other parts of this series – you can find the table of contents at the beginning of this post.
Let me know by leaving a comment in case you have any questions!
If you want to know more about fitting stitch patterns into other shapes (crescents, vortices, Faroese shawls, circles, …) please have a look at Shaping Lace.
Pingback: Crescent Shawl Lace Patterns Tutorial - knitting.today
Pingback: WIP Wednesday 50/2018: Back To Life, Back to Reality - knitting.today
Pingback: Knitting Adjustable Shawls and Making Shawls Adjustable - knitting.today
Pingback: Discovering A New Method of Knitting Faroese Shawls ... By Accident - knitting.today
Pingback: Stitch Patterns for Exotic Shawl Shapes - knitting.today
Pingback: Faroese Shawl Lace Stitch Patterns - knitting.today
Pingback: Crescent Shawl Lace Patterns Tutorial - knitting.today
Thank you for this helpful and informative post. It would be helpful to me to see a knitted swatch of the “unsuccessful” chart so I could visualize the results better.
Miranda,
thanks for the suggestion! This is a very good idea, I’ll knit a swatch for illustrating purposes. Thanks! -Julia
Pingback: Converting Charts For Triangle Shawls - knitting.today
Pingback: Tools and Helpers for Adjusting Stitch Patterns - knitting.today
Pingback: Making Stitch Patterns Work in Vortex Shawl Design - knitting.today
Pingback: WIP Wednesday 2016-11-02 - knitting.today
This will be very helpful-thanks a lot.
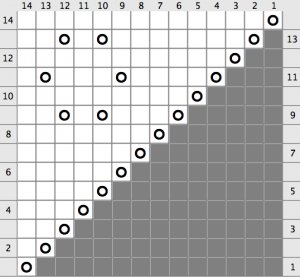
Excellent article. I’m not clear on the increase counts adding up to 20…I count 24. Would you be able/willing to indicate the increases that you’re counting to get 20?
Ten stitches on every side in the last chart add up to 20.
Very well written article. Thank you.
Great article, very clear and precise.
This is perfect timing for me as I’m wanting to do just this, add in some rectangular lace patterns to an asymmetrical scarf. So thank you, I’ll now know how to adjust and fit the patterns. And I have the graph paper. 🙂
Thank you for doing this article and are you planning on offering a course on just this topic. I believe this would be a great topic of study.
Thank you! I’m always very happy to hear feedback like this.