

Style Guides for Knitting Patterns Step by Step
What are style guides for knitting patterns, what is it good for and how are style guides created? Find answers to all these questions below, together with a complete example of creating a style guide: The style guide for Plant Anatomy.
What Is a Style Guide?
A style guide is a set of standards for the writing and design of documents, either for general use or for a specific publication, organization, or brand.
In our case, as we’re talking about knitting patterns, it’s all about creating a standard for the style of your knitting patterns: this includes font selection, color schemes, font sizes for your pattern title (and sections, subsections, your email address, your URL and everything else), the placement of your pattern pictures, and so on.
Pattern templates are there to define what’s in it. Style guides are all about how it looks. Make sure your patterns look familiar to your customers instantly – be consistent!
Try to develop your habits into standards: Habits become a standard if you decide to do certain things always in a certain way and follow this way consistently.
Choose one font and stick to it. Decide on the format of your section and subsection headlines, your text, and everything else in your template. Stick to the placement of your pattern pictures, your legend, your materials, and so on.
Turn all this into a style guide – a document including all elements with their formats, placement and look – and follow it strictly. Don’t make compromises: if a style guide is no longer appealing to your fancy, improve it. Create a new, better one you can then stick to again!
Why Create a Style Guide?
Creating a style guide, ideally together with a pattern template using this style guide as illustrative example will
- Save you time (by reusing your template),
- Increase you brand awareness and
- Create a consistent look & feel for all your publications.
A style guide is not forever. You can improve it guide anytime, add items, or recreate it from scratch. Just be consistent!
Creating Style Guides for Knitting Patterns
Step 1: Paper Size, Orientation, Columns and Margins
The very first thing to decide is the paper format and orientation: A4 or letter, landscape or portrait? As soon as you have made this decision you have a blank canvas to play around with.
Additional decisions around the overall format are how many columns to use and the size of text margins (white space around your text areas). If you have no idea what I’m talking about just decide on paper size and orientation, use a one-column format (the default in Word, for example) and use the default values of your editor for margins too.
The most simple implementation of step one is to open Word (or Google Docs) and creating a new blank file with default parameters (which means not changing anything in the default document settings).
Step 2: Font Face, Sizes and Colors
Documents – and knitting patterns are no exception – are structured by using hierarchical elements usually referred to as “Headings”: Title, sections, and subsections are examples for this hierarchy. (You are looking at a hierarchical document as you’re reading this article, too: look at the different formatting of the text versus the “Step” lines!). In Word (or Google Docs) you find formatting options called headings, too: Heading 1, Heading 2, … and so on.
You now have to decide on which headings to use (how many) and the formatting of them. My knitting patterns use three: a title, section and subsection (equal to Heading 1, Heading 2, Heading 3).
For each one, choose a font, a font size and a font color to use.
The same applies to any other form of text in your pattern: paragraphs (“normal” text), and other optional elements like image captions, pattern notes or chart titles.
Step 3: Placement of Pattern Elements
In case you got no idea what I refer to as pattern elements I wrote an article about this topic only recently: The Anatomy of Knitting Patterns. Feel free to have a look at it first.
Using the list from the article mentioned above we know the following elements will need a place in our knitting patterns:
- Logo,
- Title,
- Author info / bio,
- Copyright notes,
- Pattern notes,
- Materials,
- Pictures,
- Charts, and
- The pattern itself.
The third step is to decide how to arrange these elements in our final document: we need to find a place for each one.
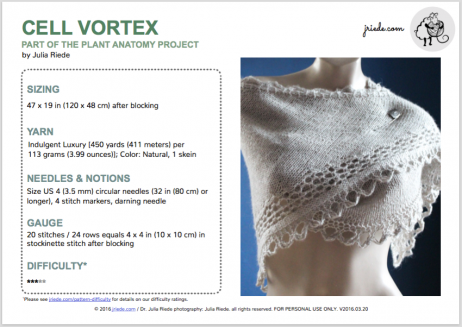
Example: The Plant Anatomy Style Guide
The pictures below show the style guide for my latest book project, Plant Anatomy, in action.

I hope this post made the process of creating style guides for knitting patterns clearer. As always, in case you got any questions, feel free to ask in the comment section below!