

How To Knit Winged Crescent Shawls
Today’s topic in our crescent shawl knitting course is how to knit winged crescent shawls. How are they constructed, and how can we knit them? After reading this article the principles, construction and even the design of winged crescent shawls will be easy for you, promise!
The Construction of Winged Crescent Shawls
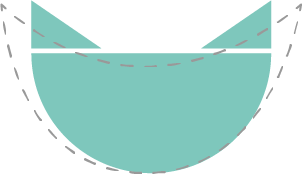
The basic idea is to use a half circle with additional shaping at the outer sections (the outer “rings” of the half circle) The wings are basic triangles worked sideways.
The final shape of winged crescents is achieved by blocking. (The dashed line in the picture shows the final shape.)
To knit winged crescents we need to know two things:
- How to knit half circles, and
- How to add wings.
Let’s start with the shaping of a half circle shawl.
Shawl Shaping: The Half Circle
Circular shawls are best worked from the center outwards, and half circles are no exception. Instead of working in the round (like for a normal circle) we cast on fewer stitches and work back and forth.

You can find detailed instructions on how to knit half circles in my earlier article Circular Segment Shawls (a half circle is a circle segment).
Adding Wings
As you can see in the picture below we need to add two wings to our half circle to create a winged crescent shawl. These wings are basically triangles worked sideways. The increase is worked on the outer side (one stitch every other row).

It totally looks like a cat, doesn’t it? Maybe I should add a cat shape to my shawl shape repertoire!
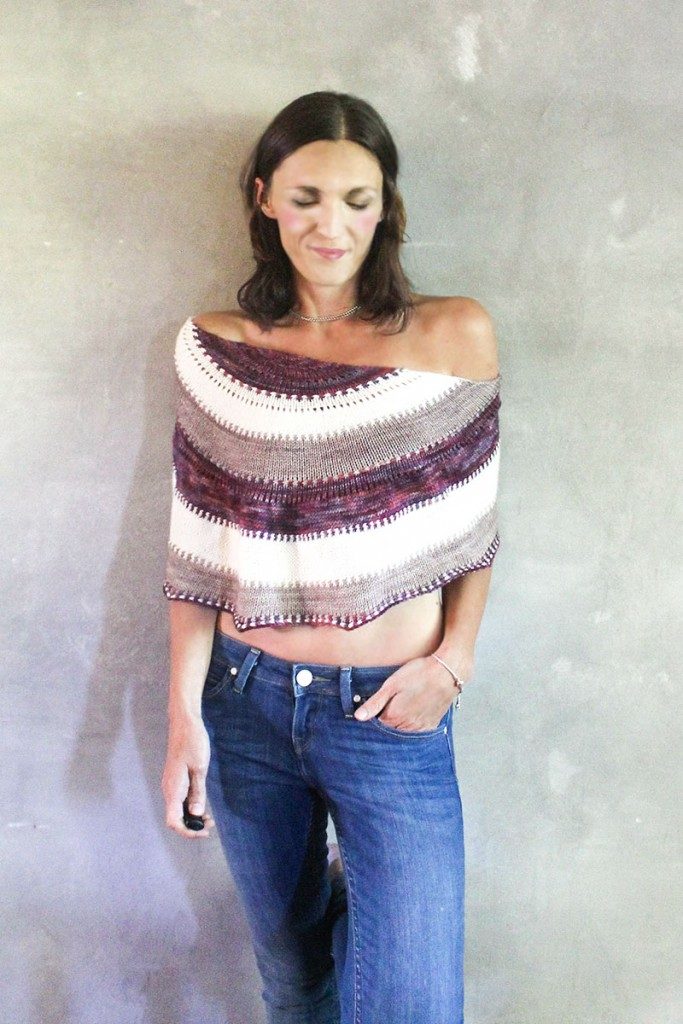
You can find a pattern template for a winged crescent shawl below. An example pattern for this shape is the Phoebe shawl shown below.
Pattern Template: Winged Crescent Shawls
- CO 6 sts and purl one row.
- Knit 2 rows.
- Increase row: K1, (YO, k1) to last stitch, YO, k1.
- Knit 5 rows.
- Repeat increase row.
- Knit 11 rows.
- Repeat increase row.
- Knit 23 rows.
- Repeat increase row.
- *
- K1, YO, k to last stitch, YO, k1.
- Next row: Knit.
- *
- Repeat from * to * 22 times more (or until shawl is of desired size).
- Repeat increase row.
- Repeat from * to * 44 times more (or until shawl is of desired size).
- Bind off loosely and block gently into crescent shape.
Thank you so much. I am a very late knitter and I love crescent shawls. Now I will try my own way using your excellent instruction.
LOVE to you and your new babe!
Kika
Thank you for this tutorial. The traditional crescent that I have seen where you increase 2 or 3 stitches at each edge on every other row, sometimes get very ong and narrow, ( which is fine if you want that look). This Pi based shawl gives more depth and is a very nice shape. Thank you for explaining it
DOES THE ASTERISK MEAN REPEAT THE ROW ABOVE?
IF NOT, WHAT??
THANKS SO MUCH
I like the pattern and have been searching for one like this!
It’s stated there. “Repeat from * to *”
Looking forward to trying this, especially since I can try and use up lots of leftover sock yarn from other projects
I love this design it looks like it will be able to blend many of the bits and pieces one has when one knits. It also means that I am able to purchase those special skeins of wonder yarn from our tribes of Indy designers. We have a yarn event in April so this perfect timing. Thanks for the share it looks to be a perfect design for all of us to wear.
Pingback: The Complete Guide to Knitting Crescent Shawls - knitting.today