
Shawl Design: Knitting Square Shawls
This article covers techniques and methods for knitting square shawls and square shawl design for square shawls.
Knitting Square Shawls Hem to Hem
Knitting square shawls hem to hem or hem in are basically two different construction methods.
Working a shawl hem to hem means working a square of a distinct width from one end to the other and picking up stitches (or use live stitches, respectively) for the edging.

Pattern Design Outline: Shetland Style Shawls (Square Shawls Hem to Hem)
The outline for a pattern for a square shawl worked from hem to hem is as follows:
- Work a swatch and check your gauge. (Our example uses 5 sts / 6 rows per inch in garter stitch.)
- Decide on the side length (one of the four sides of the square) of your shawl. (Let’s make it 80 cm in our example).
- Based on your gauge, calculate how many stitches you need to cast on and how many rows you need to reach your desired shawl size.
- Decide on an edging eventually, and in which direction it shall be worked. (It’s pretty much the same as in the last article: sideways or in the round). (Our example uses an edging worked in the round.)
Example: Shetland Style Shawls
For a side length of 40 inches we need to cast on
40*5 = 200 stitches
and work a total of
40*6 = 240 rows.
So an example pattern could read as follows:
Shawl Body
CO 200 stitches (sts) and work 240 rows (120 ridges) of garter stitch.
Edging
Place marker (pm), pick up and knit 200 sts along one side of the shawl body, pm) 3 times, k200.
Increase row: (slip marker (slm), knit into front and back and front of the next stitch (kfbf, 1 stitch increased to 3 sts), knit (k) to next marker) 4 times.
Next row: purl.
Repeat last two rows until edging is of desired size. Bind off all sts loosely and block gently.
Shawls worked from hem inwards
Shawls worked from hem inwards work like a mirror image of the four-panel shawl worked from center out: you start with four times the amount of stitches you need to achieve the desired shawl width (in our example case outlined above we need to either cast on, or pick up from the edging,
4*200 + 4 = 804 stitches
where the four single stitches are the divider stitches used between the panels. Please note that the divider stitches are not mandatory here, as we are not dealing with yarn over increases. But: paired decreases, as used here, tend to leave little holes between them. It’s prettier – more even – when panel divider stitches are included.
Knitting Square Shawls Diagonally
Knitting a square shawl diagonally means starting at one tip, increasing to a certain size and repeating the reverse process for the other half of the shawl.
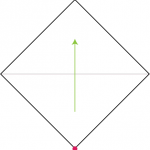
As an increase angle of 90° is desired, two stitches need to be increased every other row for the increase section of the shawl body. For the decreases the same principle applies.
In this setup is possible (and common) to work the edging at the same time as the shawl body. Either way, we start with casting on three stitches and increasing continually until the shawl is of desired width at the center diagonal (the position of the widest width).
Working Diagonally: Design Process Outline
The outline of the shawl design process for square shawls tip to tip is as follows.
- Work a swatch and measure gauge.
- CO 3 sts and purl one row.
- Optional (with edging): work increase rows until edging is of desired width (upper edge of the orange triangle shown above).
- Work increase rows until shawl is of desired width.
- Work decrease rows until 3 sts are left, then bind off.
Pattern Template: Working Diagonally
Our example assumes we are working a garter stitch edging together with the shawl body. The width of the edging (upper edge of the orange triangle) shall be two inches (one inch per side).
Work a swatch and measure gauge. Example: 5 sts / 6 rows per square inch.
Decide on the desired width at the widest point (diagonal) of the shawl. Example: 30 inches total width (incl. edging).
Calculate the relevant stitch counts: we need 6 stitches per side for the edging, (5 stitches per inch plus one selvedge stitch on the outer side) and
30 inches * 5 stitches/inch = 150 stitches
total width.
So our pattern template reads as follows:
CO 3 sts and purl one round.
Increase row: sl1, m1R, pm, ktbl, pm, m1L, k1. (5 sts)
Next row: knit.
Increase row: sl1, k to next marker, m1R, slm, ktbl, slm, m1L, k to end of row. (7 sts)
Next row: knit.
Repeat the last two rows until there are 13 sts total, then start shawl body:
Increase row:sl1, k to next marker, slm, YO, ktbl, YO, slm, k to end of row. (15 sts)
Next row: knit edging stitches, purl body sts.
Increase row: sl1, k to next marker, slm, YO, k to next marker, YO, slm, k to end of row. (15 sts)
Next row: knit edging stitches, purl body sts.
Repeat the last two rows until there are 151 stitches between the markers.
Decrease row: sl1, k to next marker, slm, ssk, k to 2 sts before next marker, k2tog, slm, k to end of row. (149 sts between markers)
Next row: knit edging stitches, purl body sts.
Repeat the last two rows until all increased stitches are decreased again (until 3 sts are left total), then cut yarn, put through stitches and pull tight.
Weave in ends and block gently.
Summary
This article introduced square shawls Shetland style (worked hem to hem), square shawls worked from hem inwards and square shawls worked tip to tip (diagonally).
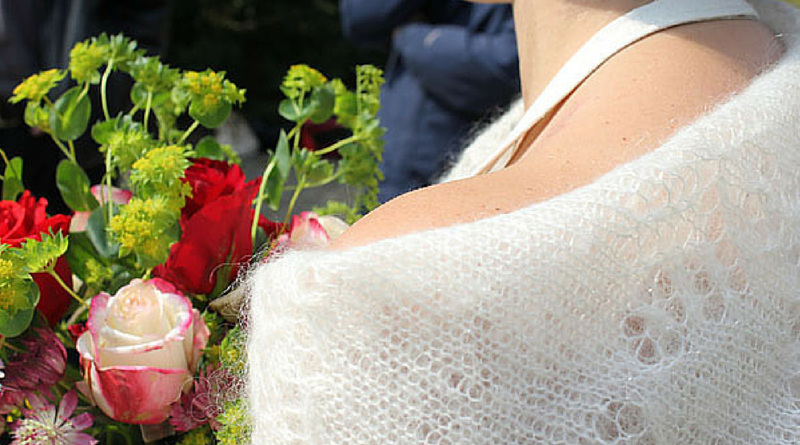
Personally, I don’t like to work square shawls from hem in so I tend to either work them from center outwards or hem to hem. An example for the latter is my pattern Orenburg Meets Germany (shown above).
Pingback: Knitted square shawl – Seaford Spinners and Weavers
Pingback: Shawl Shapes Overview 2019: Julia's New Shawl Design Cheatsheet
Pingback: Shawl Design for Everybody - Your Free Shawl Design Online Course
Pingback: 365 Days of Shawl Knitting - knitting.today
interesant.imi place
Pingback: Shawl Design for Everybody - Your Free Shawl Design Online Course