How To Knit Crescent Shawls
Welcome to the next episode of my Shawl Design for Everybody series! Today’s topic in our shawl design course is how to knit crescent shawls. There are two ways to achieve a crescent shawl shape: by knitting crescent shawls sideways, or by working short row crescent shawls.
Crescents have been very popular shawl shapes for a few years and don’t seem to lose any popularity among knitters all over the world so far. Guess it’s time to devote some time to explain crescent shawls in detail: how do they look like, and how can they be constructed?
Crescents Worked Sideways
Crescent shawls worked sideways are a combination of two triangles worked sideways with a rectangle shawl shape. The crescent shape is achieve by blocking.


This shape is achieved by casting on a few stitches, working increase rows one side only until the desired width is reached, then working straight rows until shawl is of desired length, and finally work decrease rows (on the same side!) until a few stitches are left.
Pattern Template: Crescents Worked Sideways
- CO 3 stitches and purl one row.
- Next Row: K1, YO, k to end of row.
- Next Row: Knit.
- Repeat the last two rows until desired width is reached.
- Next Row: knit.
- Next Row: knit.
- Repeat the last two rows until shawl is of desired length (minus the length of the increase section worked earlier).
- Next Row: K1, ssk, k to end of row.
- Next Row: Knit.
- Repeat the last two rows until 3 stitches are left over.
- Bind off and block into crescent shape.
Short Row Crescent Shawls
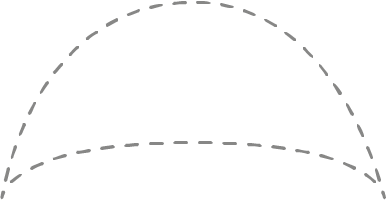
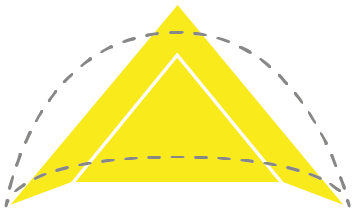
Short row crescent shawls consist of a triangle shaped by short rows and an edging. They can be worked top-down as well as bottom-up. The final crescent shape is achieved by blocking. The figure below shows a crescent shawl shaped by short rows before (yellow) and after (dashed line) blocking.

So how are short row crescent shawls being constructed, and how can one calculate the number of stitches to cast on, the distribution of short row turning points and the resulting width and height?
Construction Methods for Short Row Crescent Shawls
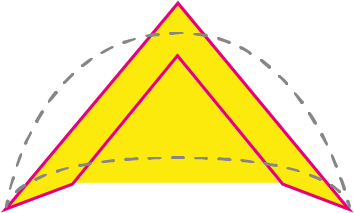
The two most challenging parts of short row crescent shawl shaping are the short row section and the increases at the outer part (when working from neck down, otherwise – when working bottom up – the increases are implemented shortly after the start at the lower hem.
If you want to learn more about short rows before continuing you can do so by reading my article The Complete Guide to Short Rows.
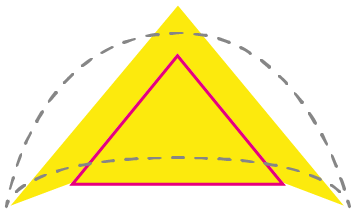
The first interesting part is the part actually shaped by short rows (outlined in pink below). I’ll refer to this part of the shawl as the “short row section” from now on.

In contrast to working triangle shapes in shawl design shaped by increases (or in this case, by decreases as we’re starting at the wider side, not the tip of the triangle), working short rows to shape this triangle creates live stitches at both edges. These live stitches are then used to further expand the shawl towards the outside and the basis for the outer part of the shawl (see below).

So let’s see how to plan a short row crescent shawl design. Where do we start?
The Design Process
The very first thing when designing a short row crescent shawl is the same as for any other shawl design: select yarn and knit a swatch to determine your stitch and row gauge.
The second and third number we need to decide on is the desired width and height of your shawl. Good estimates for crescent shawls are 47 by 20 inches (120 by 50 cm).

Having determined your gauge, desired width and height, it’s time for some serious number crunching.
Calculations
First of all: how many stitches do we need to cast on? We know which final width we are aiming to but there’s a little more detail in it as we are dealing with a combination of two sections as mentioned above. Our width is therefor a combination of two different lengths: the lower part of the triangle (our cast on edge, called A in the picture below) and the length referred to as B below which is determined by the height of the outer section.

Personally, I don’t go into much detail when calculating the number for B but usually use the approximation B = 1/3*A.
So let’s calculate the number of stitches we need to cast on first which equals the number of stitches to obtain a width of A. The total width (let’s call it W) equals
W = A + 2*B
and we assume (as mentioned above)
B = 1/3 * A
which gives us
W = A + 2*(1/3 * A) = 3/3*A + 2/3*A = 5/3*A,
and thus
A = 3/5*W.
For calculating the number of stitches to cast on (called C below) based on our desired width W we first need to calculate A as shown above, then calculate C based on A and our stitch gauge.
Let’s assume we want a total width of 45 inches and our gauge swatch resulted in 5 stitches per inch.
A = 3/5*W = 3/5*45 = 27
C = A * 5 = 27*5 = 135
In this case we need to cast on 135 stitches.
For calculation of the outer section we can either use B (and our row gauge) and increase on each side every row or every other row; or we could increase all stitches within one or two rows. As a rule of thumb for how many stitches to increase use approximately 10-20% of the live stitches at the beginning of the outer section (the end of the short row section).
Short Row Calculations
The calculation of short row turning points is covered in part three of this series (Short Row Calculations Made Easy).


Pingback: The Complete Guide to Knitting Crescent Shawls - knitting.today
Pingback: Shawl Design for Everybody - Your Free Shawl Design Online Course
Pingback: Crescent Shawl – Seaford Spinners and Weavers
Pingback: 365 Days of Shawl Knitting - knitting.today
Pingback: Impressions From Austrian Yarn Club Wollness Weekend - Knitting.Today
Pingback: Shawl Design for Everybody - Your Free Shawl Design Online Course